Mast and Base Progress
I was very fortunate that some local Amateurs with 4 x 4 vehicles were able to collect my (very heavy) purchase and transport it to the home QTH. I then had the task of cleaning it, replacing some bolts and fitting a new stainless steel winch rope, followed by adequate amounts of grease where needed.
 Altron CM35 Mast Main Section
The mast comprises a base post, main square tubular section (seen left) extension round tubular section and a top stub and cage (seen below with weather sensors attached).
 Stub Mast and Rotator Cage
The large boss on the left of the cage is bolted to the stub mast and inserts into the top of the main round section, where it's secured with 3 bolts and locking nuts.
 Base Post - Minus Winch
The base post carries the entire mast, allowing it to be tilted on its hinge pin, which fits through the 2 holes in the top bracket.
The lower 1 metre of the base post is designed to be buried in concrete, but instead of burying it directly, I decided to use a sleeve so that the entire mast could be removed and the ground reinstated over the top of the sleeve. The sleeve is constructed from 4" square box section steel and I had it galvanised to prevent rust.
 4" Galvanised Sleeve
The base post is a snug fit which helps prevent it rattling in the wind. The addition of the sleeve also meant that it could be pre-installed in concrete and vertically aligned, making it a relatively easy task to drop the base post in, once the concrete had set. The top of the sleeve was temporarily sealed with gaffer tape to prevent ingress of concrete.
 1 cu metre Base Cavity
Once all of the separate components were prepared, it was of course necessary to dig a 1 cubic metre hole to mount the base and sleeve in concrete. This was quite a tricky operation because the mast is mounted very close to the house foundations and the main soil pipe runs along the opposite side. Because there was no spare room to fit me and a spade, I used a 'spoon' shaped shovel with a very long handle to excavate the surrounding clay.
With the base cavity excavated to the required size, I added stainless steel pins to the house foundation to tie the concrete together. The base post sleeve was then positioned and eventually wedged, so that it was vertically plumb in all directions.
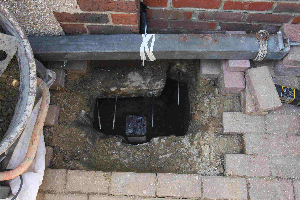 Base Sleeve in Situ
The next task was to fill the hole with concrete and tamp it down to ensure that it filled any air pockets.
 Concrete filling completed
To give the concrete a good shaking, I mounted an old SDS fitting onto a wooden block and used my SDS pneumatic hammer drill with rotary stop. Very noisy, but effective. You can just see the top of the base sleeve with the gaffer tape ready to be removed with a sharp knife.
I left the concrete to set for about 10 days and then dropped the base post into its sleeve and checked it once again for plumb, before reinstating most of the surrounding paving blocks.
 Base Post In Place
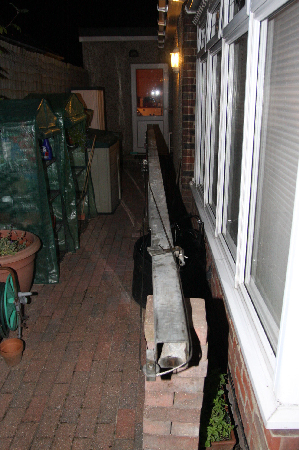
The next stage was to mount the main mast onto the base post and engage the hinge pin. After this the winch was re-fitted along with the pulley wheels and finally the winch rope was attached.
 Mast Installed With Winch
As you can imagine, aligning the mast and hinge pin precisely, was not an easy task and it took three of us to take the weight and manoeuvre it into position.
The winch is a fairly standard boat winch and is held on the base post by 4 bolts. It's important to make sure that there are enough turns of rope on the winch, so that the rope can't detach itself when the mast is fully luffed. It's also important to ensure that the ratchet brake is fully functional!
I did find one snag. I had allowed for the base post to be dropped in so that the one metre mark (left by the previous owner) lined up with final ground level. Unfortunately, this meant that the locating pin at the bottom of the main section dug into the ground.
Although I could have dug a groove in the base concrete to accomodate it, I preferred to raise the entire base post by about 50mm.
 Angle Iron added to Base Post
I used 4 pieces of angle iron for this with small blocks under it. I then drilled and tapped 4 holes in the base post and bolted the angle irons to it. The base post had to be jacked up to do this and two of us managed that using a couple of crowbars.
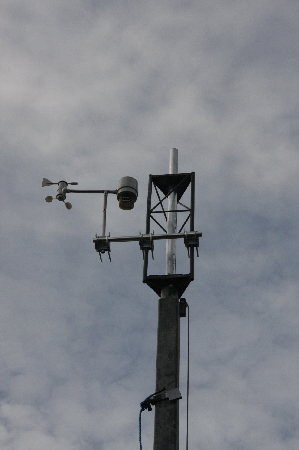 Mast with Rotator Cage
Finally the rotator cage and weather station sensors were mounted on the top of the mast and the mast raised to vertical and left for a short while for the neighbours to get used to it, or complain about non-existent interference!
The Altron mast is used to support my VHF and UHF antennas. The present lineup is a crossed 9 element Tonna for 2 metres, above that a 19 element Tonna for 70cms (horizontally polarised) and a Diamond V2000 collinear for 6 metres, 2 metres and 70 cms.
I started out with a Kenpro KR400RC rotator, but that has now been replaced by a Yaesu G650 and the old Kenpro is destined to be used to rotate a mag-loop receiving antenna for HF, which hopefully will help to null-out the dreadful pulse noise in this area, which fortunately does seem to be directional.
The VHF/UHF antennas can be seen by following the menu (above) under "The Shack" heading.
